
Overview
PvP missions are the highest-risk Earth missions, but can be completed in far less time than a Harvesting Mission and can yield similar rewards if successful. PvP missions provide the highest XP rewards as well.
Players start a raid by choosing three Bees from their hive to build their Attack Squad. They will be shown three Defense Squads that have Been set by other players with their similar hive level. The attacking player can choose one of the three Defense Squads to raid.
Once the PvP opponent is confirmed, the Raid begins, the order and effectiveness of each attack move by both Squads is determined by the battle’s readiness meter. (see below for details)
If the Attacking player wins
Successful Attacks steal Honey from the Defense Squad’s hive. The total possible reward will be displayed at the top of the screen when you are setting up your battle. The actual reward is affected by the maximum Honey Capacity of up to three Attack Squad Bees who survive the battle.
If the Defending player wins
Successful Defenses steal Honey from the Attack Squad’s hive. The amount is affected by the maximum Honey Capacity of the three Defense Squad Bees, regardless of how many survived the raid.
NOTE: Consider setting a defense squad as your first step in PvP missions to avoid being an easy target (details below). Without a Defense squad the Honey in your hive is exposed to raids and potential loss.
Stats Affecting PvP
Agility | Affects the Readiness Meter (details below) |
Capacity | Determines how much Honey you can win/lose |
Luck | Bee with the highest Luck stats will automatically be placed at the end of the Readiness Meter and will have the first attacking run |
Recovery | The speed at which they regain their Health after the battle depends on their Recovery stat |
Endurance | No effect on PvP |
Health | The Health of your Bee - which decreases during PvP - regenerates to full Health as Bee rests in the Hive |
Attack | The higher the Attack stat, the more Health points an enemy Bee loses when you attack them |
Defense | The higher the Defense stat, the fewer Health points your Bee loses when attacked |
Setting a Defense Squad
The Defense Squad is one of the most important parts of the PvP mission. It gives players a chance to protect their hives from attacks and revenge attacks.
Before you go shopping or collecting Bees for PvP, consider the following:
NOTE: See below for examples
Mood matching Bees/Queen
Ideally your Defense team should have 3 Bees mood matched to your Queen’s mood
- Your Bee's base stats gets a percentage bonus for Health, Attack, Defense, Agility and Luck which gives an edge in both attacking others and defending your hive from attacks
The percentage of boost you receive is based on the Queen's Level and Generation. The boost is calculated from the Queen's current stat.
Visit the Mission Boosts Player Guide for further details.
Landform advantage
Depending on Landform Specialty, a Bee’s Attack stat can increase, decrease, or stay the same during a PvP Mission. Pay close attention to the Landform Specialty of all Bees during PvP to take advantage!
EXCEPTION: None speciality has no advantage or disadvantage
| Attack Stat Boost | Against | Attack Stat Reduction | Against | |
| Woodland | 30% | Summit | 30% | Desert |
| Summit | 30% | Desert | 30% | Woodland |
| Desert | 30% | Woodland | 30% | Summit |
| Seaside | 50% | Meadow | - | - |
| Meadow | 50% | Seaside | - | - |
| None | - | - | - | - |
Matching Likes and Dislikes
Match the Likes of your Bees on the same Attack or Defense team to receive an additional boost to their Capacity stat.
- Two Bees with the same Like - 10% Capacity Boost
- Three or more Bees - 30%
Match the Dislikes of your Bees on the same Attack or Defense team to receive an additional boost to their Health stat.
- Two Bees with the same Like - 10% Health Boost
- Three or more Bees - 30%
Match your Bee’s Like with your Queen’s Like for your Bee to receive a Defense stat boost.
- Genesis - 25% Defense Boost
- Gen 1 - 20%
- Gen 2 - 15%
- Gen 3 - 10%
- Training - 5%
Match your Bee’s Dislike with your Queen’s Dislike for your Bee to receive an Attack stat boost.
- Genesis - 25% Attack Boost
- Gen 1 - 20%
- Gen 2 - 15%
- Gen 3 - 10%
- Training - 5%
Readiness Meter
The Readiness Meter is created for each Raid and determines the order that each Bee will attack or defend based on their Luck and Agility stats. Of the six Bees in the battle, the Bee with the highest Luck stat has the first move, followed by the Bee with the highest Agility stat. These alternating attack moves will continue until all of one Squad’s Bees have no remaining Health or the number of allotted turns ends.
Number of available upgrade slots
When buying Bees, check the number of upgrade slots that are unused as you may want to upgrade specific stats for PvP use.
Attack Profiles
See details on Normal and Special Attack profiles below.
Choosing an Attack Squad
The Attacking player can choose any three Bees from their hive that are available for missions. In general, they will look to choose Bees with high base stats and the needed skills to counter the Defending Bees’ strengths.
Starting a PvP mission
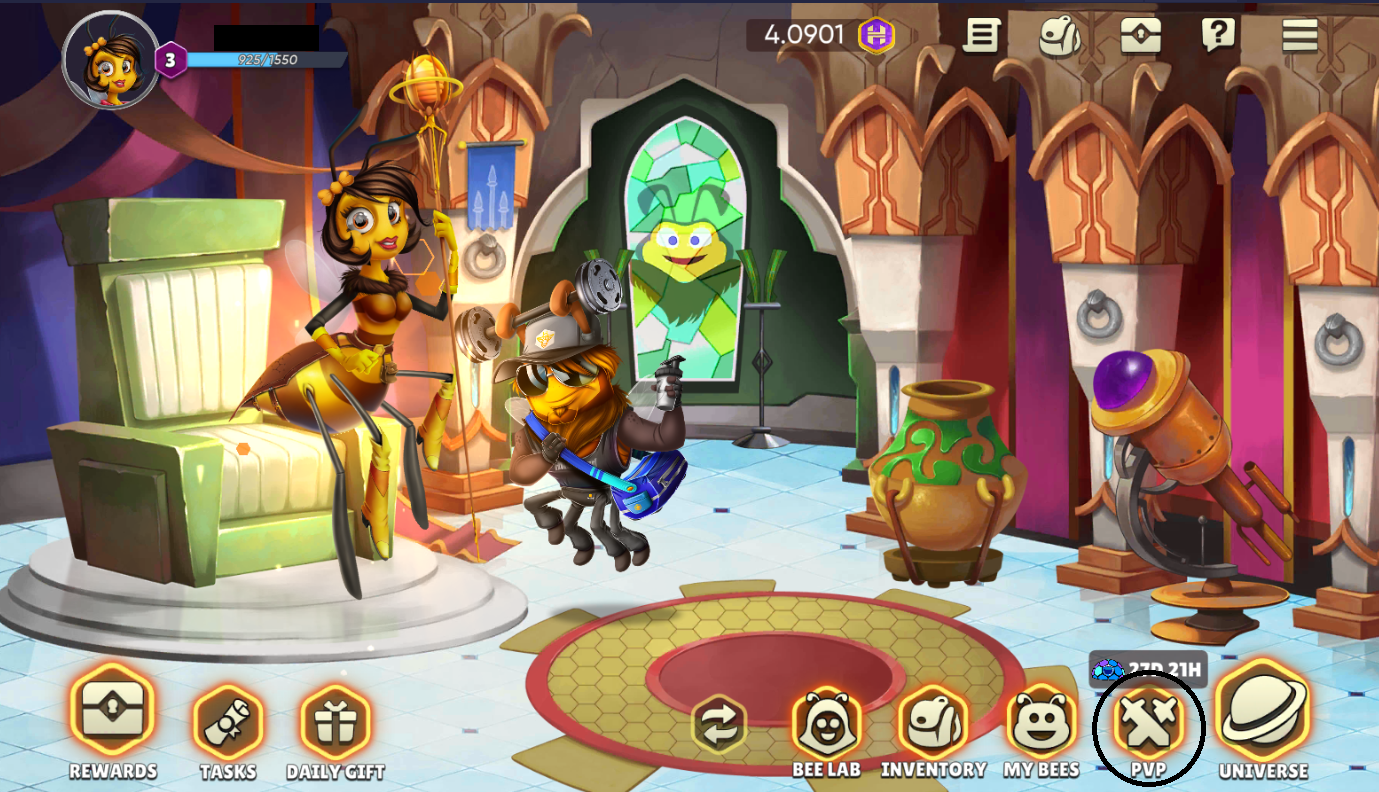
Tap the PvP button in the bottom right-hand corner of the Hive
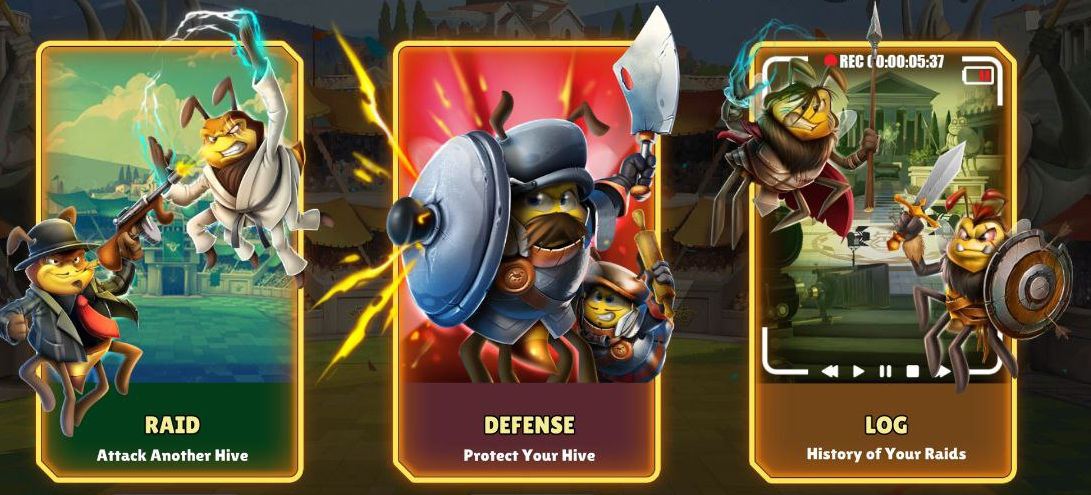
Tap "Raid" to proceed
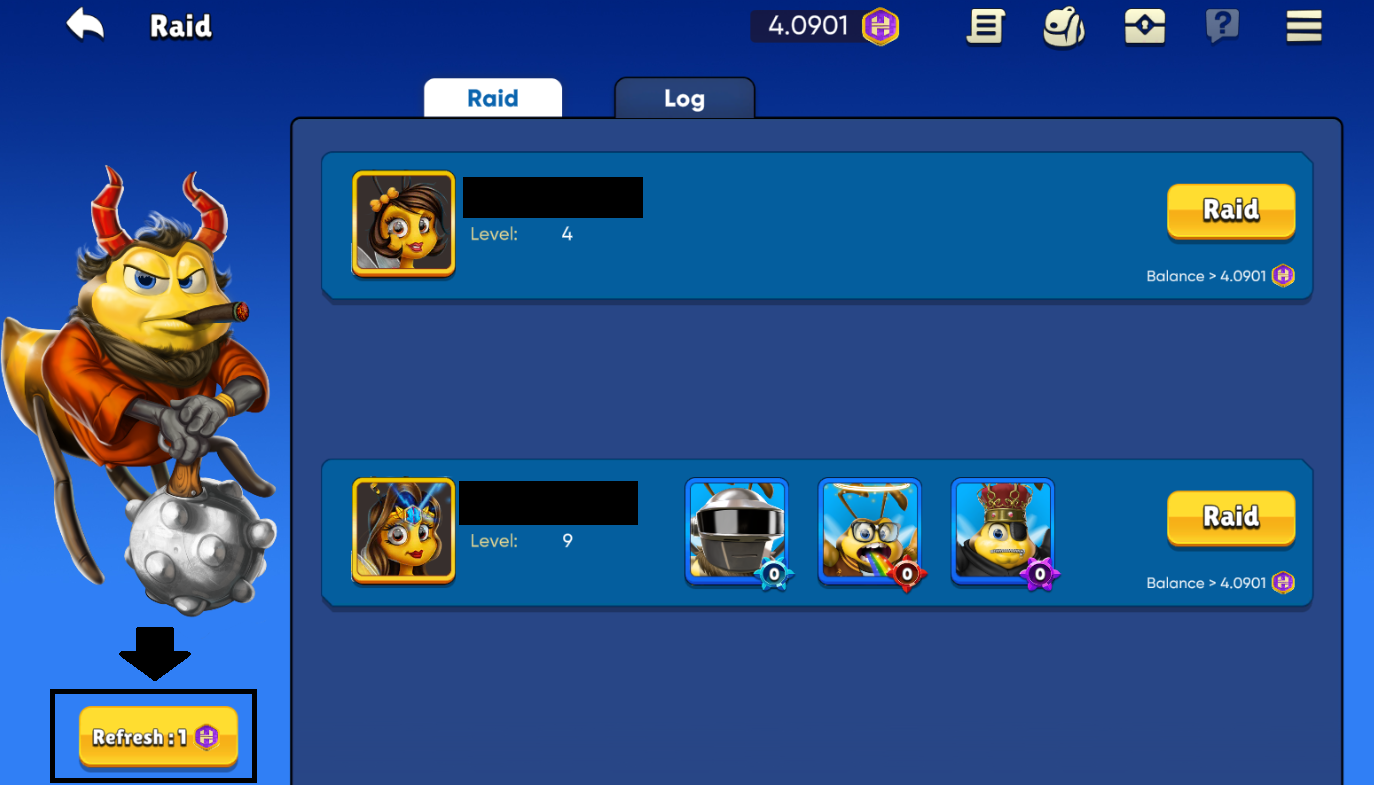
You will be shown three Defense Squads to choose from. If you don't want to attack any of them, select the "Refresh" button located in the bottom left corner of the window.
NOTE: You need to have at least one Honey (HXD) in your account to refresh the Defenders. The refresh cost is roughly 0.33 (HXD) per result you get.
EXAMPLE: If you only get two targets from the refresh you will be charged 0.66 (HXD).
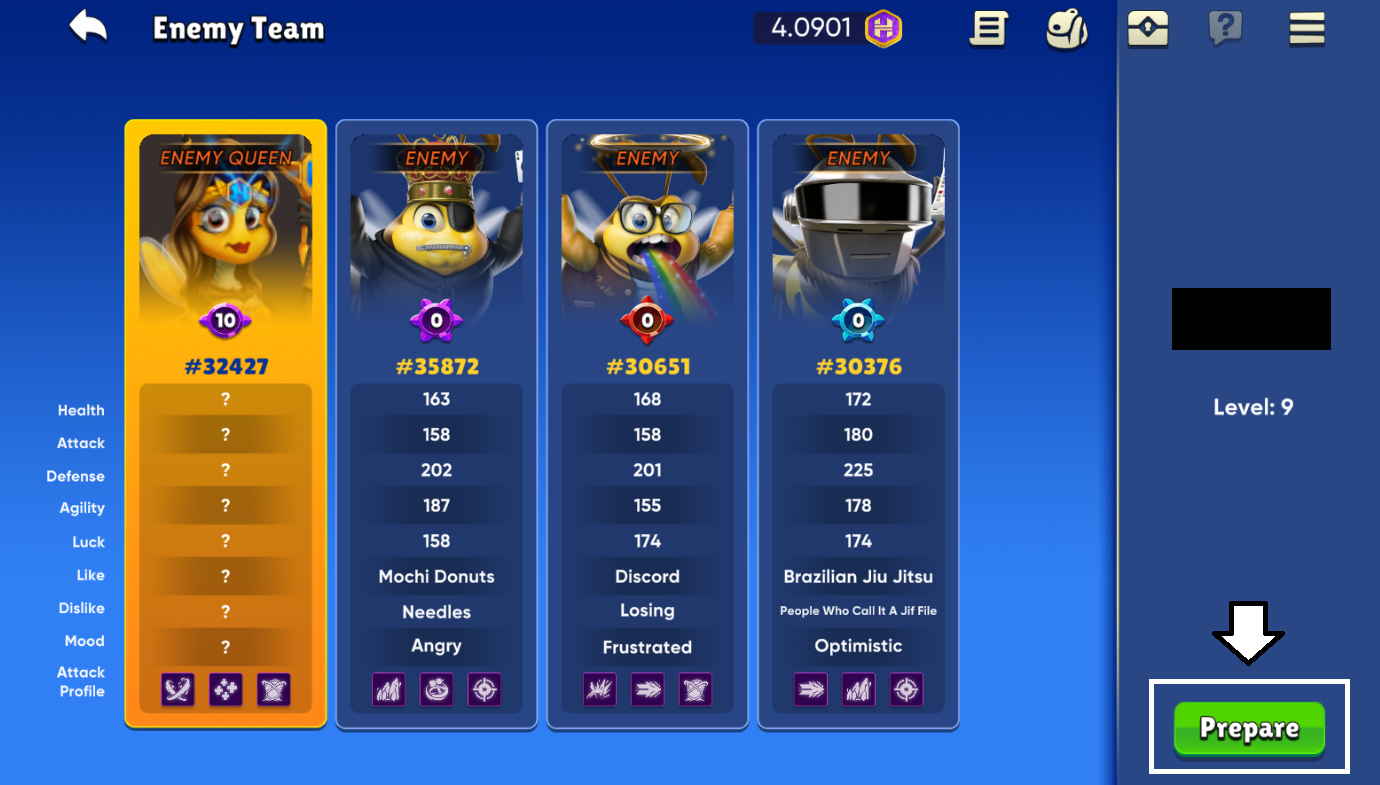
The Attacking player will see information about each of the three Defense Squads they have to choose from, including:
- How much Honey the hive has
- The Health, Attack, Defense, and Agility stats for each of the three Bees on the Defense Squad
- The Landform Specialty, Likes, and Dislikes of each of the three Bees
Using this information, the Attacking player can have a good idea of the possible outcomes.
Select an opponent team by tapping the "Raid" button. Then tap the "Prepare" in the bottom right-hand corner of the screen.
Tap the "Raid" button to access a new window where you can assemble your Attack team. To add Bees to your team, simply click on the "+" symbol to choose an available slot. Your Bees will be highlighted in the panel on the right. Select the members you want to include in your Attack team. Once you've completed your team, tap the "Start Raid" button.
The fight screen is an auto-battler, which means you can sit back and watch! If you wish, you can speed up the process by selecting the option located in the top right-hand corner of the screen. The battle unfolds based on the choices you made when putting your Attack team together.
Cooldown and Recovery
There is no cooldown period after the Attack mission for either players’ Bees. However, the Attack Squad Bees will return to the hive in whatever Health condition they ended the attack. Attack Squad Bees will begin to regain their Health back while in the hive. The speed at which they regain their Health depends on their Recovery stat.
Being at less than full Health does not affect the ability of the Bee(s) to go on Earth missions and does not affect the performance on Harvest or Hunt. However, if a Bee from the Attack Squad has his Health diminished to zero, he becomes paralyzed and goes to recovery mode until regaining full Health.
The Defender’s Bees will immediately return to their hive after the Attack in the exact same condition as before the attack, regardless of any impact to their Health stat during the battle.
NOTE: Since there is no cooldown period after an Attack mission, some players will choose to send their Bees on an Attack mission before sending them to Hunt or Harvest.
Attack Profiles
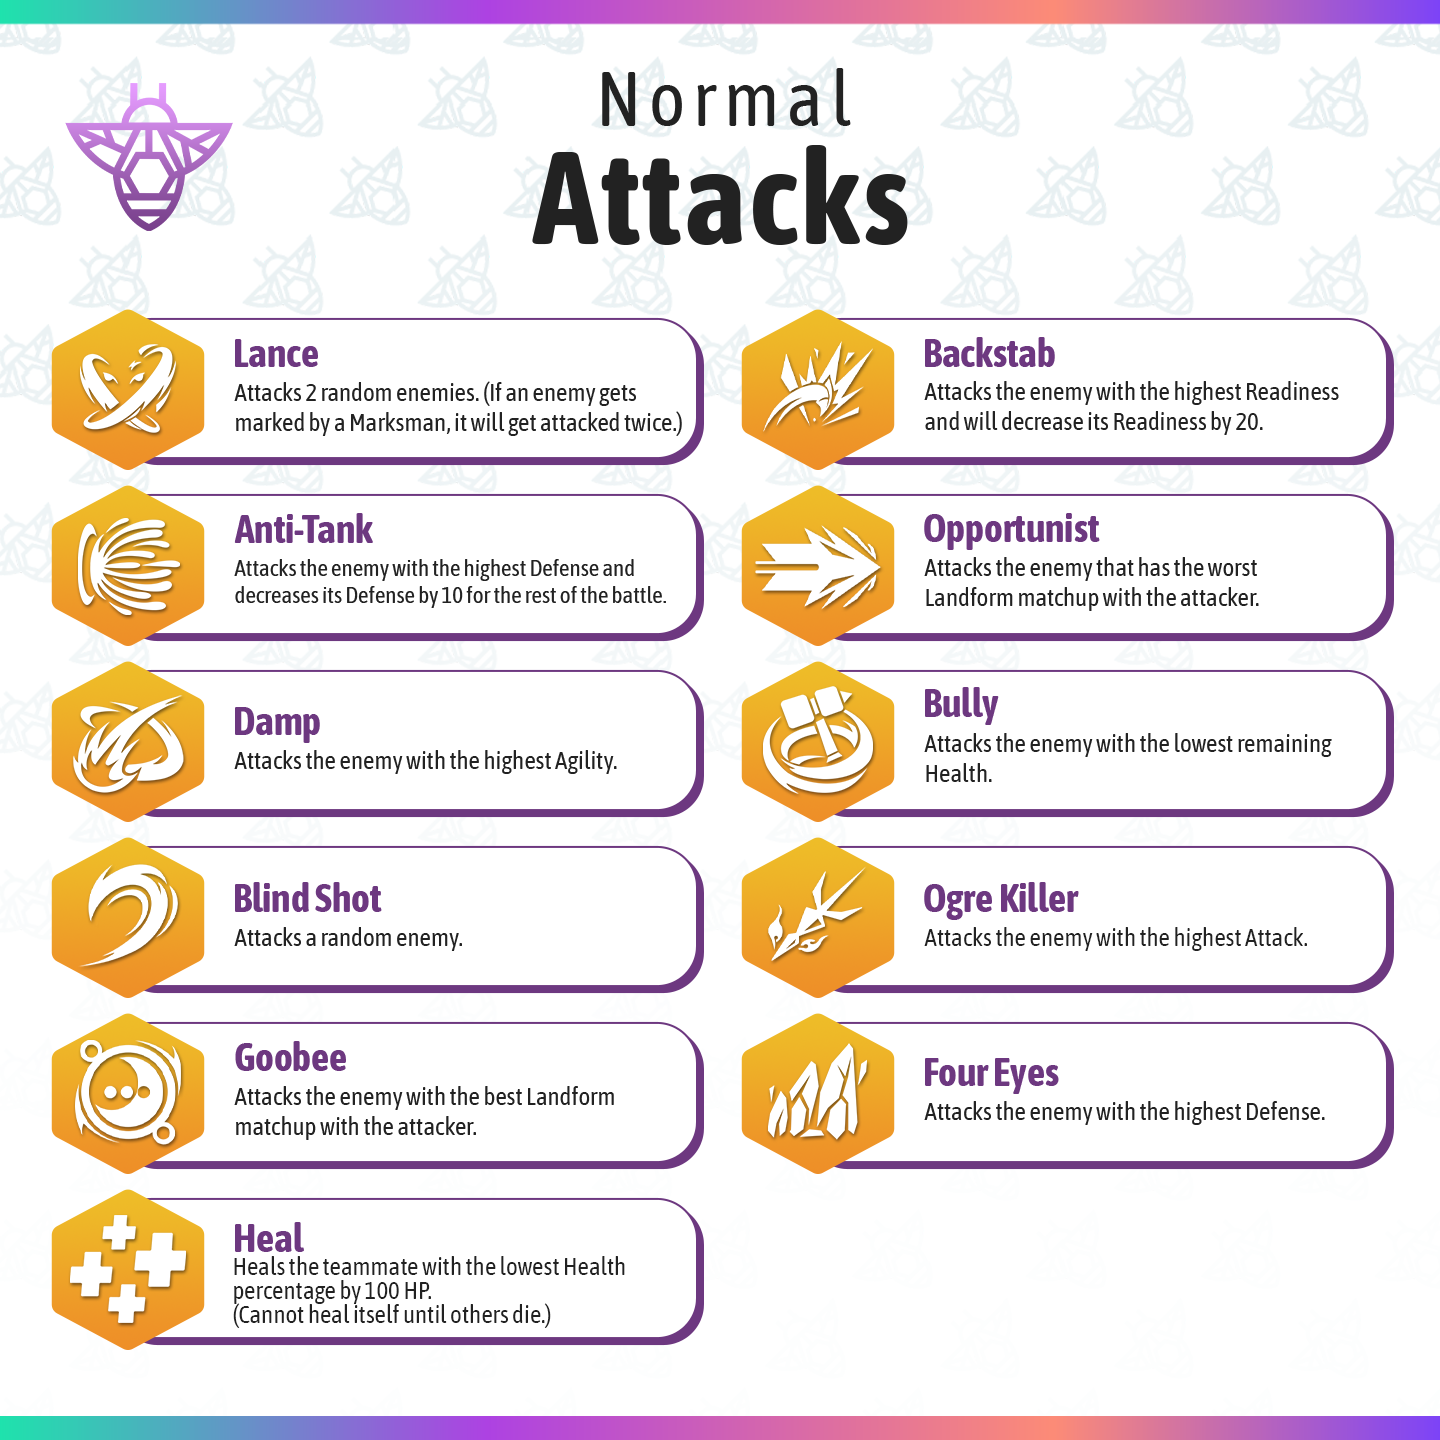
Attack Profiles determine which Defending Bee the Attacking Bee will target and what happens during that Attack. Bees have two main Attack Profiles and a Special Attack Profile.
When it is a Bee's turn to Attack, one of their two main Attack Profiles will be randomly assigned. Their Attack Profile will determine which Bee they will choose to Attack on each turn and what happens on that Attack.
Example of how Attack Profiles can work:
- Attack the enemy Bee with the highest Attack
- Attack the enemy Bee with the highest readiness and decrease his readiness by 20
- Attack the enemy Bee with the most beneficial Landform
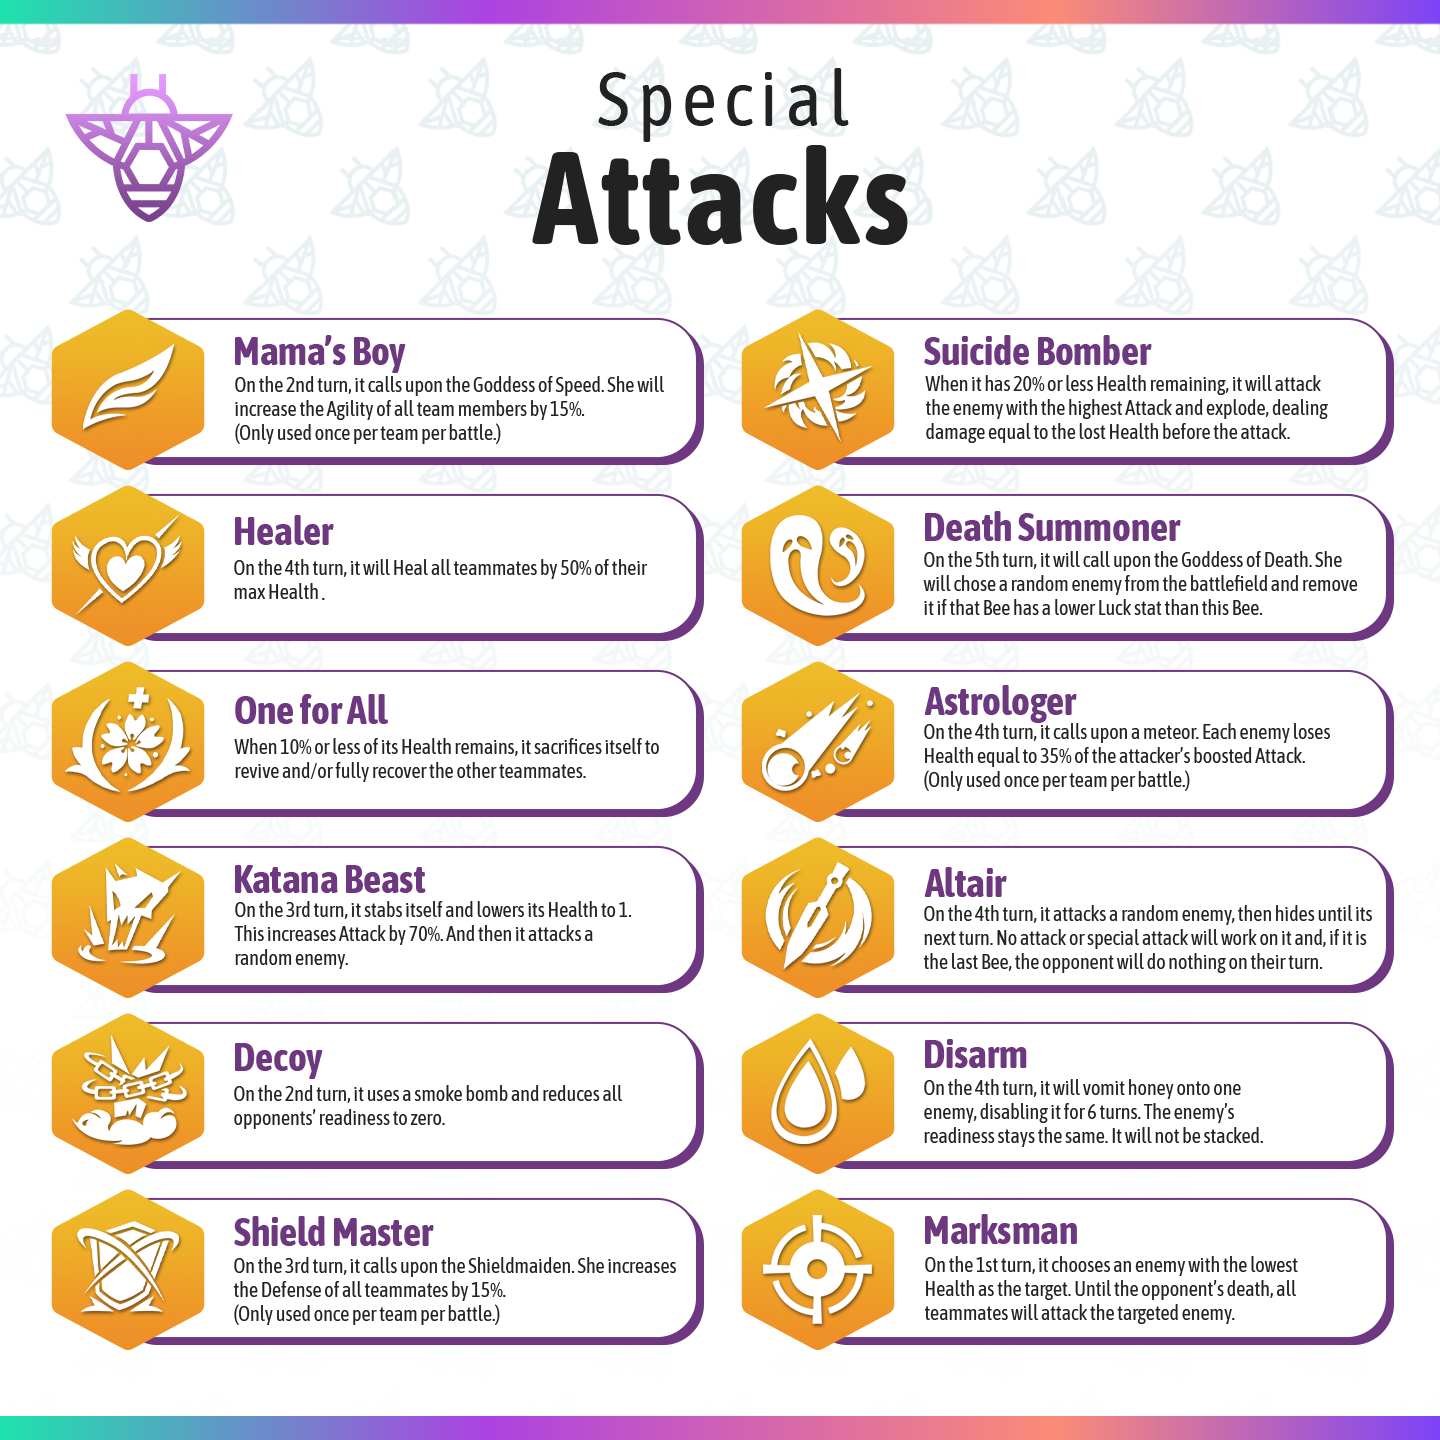
In each Raid, a Bee's Special Attack Profile will be a predetermined move on a predetermined turn. These will only be used once in each Raid (if the Bee is still alive when the turn is reached).
Examples of how Special Attack Profiles can work:
- On his second turn, use a smoke bomb which will reduce all opponents' readiness to zero
- When 10% or less of Health remains, he will sacrifice himself to revive and fully restore the health of any remaining Bees on his squad to full Health
- On his fourth turn, call upon a meteor which will cause all enemy Bees to lose 50% of their current remaining health
Results
When a player Attacks, the result will be determined by the stats of the Bees involved.
The Attacking Bee will reduce the Health of the Defending Bee(s) by the difference between the Attacking Bee’s Attack stat and the Defending Bee’s Defense stat. In the case that this is a negative number, the Defending Bee’s Health will be reduced by 1.
During the Raid, there is a gameplay mechanic called ‘Progress’ that will slowly deplete the Attack Squad Bees’ Defense and Attack stats as the Raid goes on.
When a Bee’s Health stat reaches zero, that Bee will be removed from the Readiness Meter and he is knocked out of the Raid. Once a player knocks all three of the other player’s Bees out of the Raid, they will be declared the winner and the Honey (HXD) will be distributed accordingly.
Progress Mechanic
The Progress mechanic gradually depletes the Attack Squad Bees' Defense and Attack stats as the Raid progresses. This mechanic adds a strategic element to the Raid, making it more challenging as time goes on.
Damage Calculations
Real damage calculates regardless of Enemy's Defense and it is 5% of Boosted Attack.
EXAMPLES:
- Enemy's Boosted Defense = 300
- Enemy's Boosted Health = 500
- Player's Boosted Attack = 400
- Damage = (400 - 300) + (400 * 0.05) = 120
- Enemy's New Boosted Health = 380
- Enemy's Boosted Defense = 600
- Enemy's Boosted Health = 200
- Player's Boosted Attack = 500
- Damage = (500 - 600) + (500 * 0.05) = (No damage for Attack --> 0) + (25) = 25
- Enemy's New Boosted Health = 175
Examples
Defense
| Defense | ||
| Boost Your Bee's Defense Stats by Matching Moods and Likes | ||
| Assume the Following: | ||
| Queen Defense Stat | 190 | |
| Queen Type | Training | |
| Queen Level | 10 | |
| Bee's Base Defense Stat | 140 | |
| Mission Boost | ||
| Base Defense Stat of Bee | 140 | |
| *Bee Matches Queen's Mood | 5% Boost Based on Queen's Stat and Type | |
| *Bee Matches the Like of the Queen | 5% Boost Based on Queen's Stat and Type | |
| *Bee Matches the Mood of 2+ Additional Bees on the Mission | Additional 15% Boost | |
| Effective Stat After Boosts: 181 | ||
| * See the Mission Boosts Player Guide for further details | ||
Attack
| Attack | ||
| Boost Your Bee's Attack Stats by Matching Moods and Dislikes | ||
| Assume the Following: | ||
| Queen Attack Stat | 184 | |
| Queen Type | Gen 1 | |
| Queen Level | 12 | |
| Bee's Base Attack Stat | 150 | |
| Mission Boost | ||
| Base Attack Stat of Bee | 150 | |
| *Bee Matches Queen's Mood | 24% Boost Based on Queen's Stat and Type | |
| *Bee Matches the Dislike of the Queen | Additional 20% Boost | |
| *Bee Matches the Mood of 2+ Additional Bees on the Mission | Additional 15% Boost | |
| Effective Stat After Boosts: 267 | ||
| PLEASE NOTE: There is a further impact to the Attack Stat based on the Landform Specialties of the Bees involved in each turn of the battle. See the Player vs. Player - PvP Landform Advantages and Disadvantages chart for details | ||
| * See the Mission Boosts Player Guide for further details | ||
Health
| Player vs. Player Example - Health | ||
| Boost Your Bee's Health Stats by Matching Moods and Dislikes | ||
| Assume the Following: | ||
| Queen Attack Stat | 190 | |
| Queen Type | Training | |
| Queen Level | 10 | |
| Bee's Base Health Stat | 140 | |
| Mission Boost | ||
| Base Health Stat of Bee | 140 | |
| *Bee Matches Queen's Mood | 5% Boost Based on Queen's Stat and Type | |
| *Bee Matches the Dislike of 2+ Additional Bees on the Mission | 30% Boost Based on Bee's Stat | |
| *Bee Matches the Mood of 1 Additional Bees on the Mission | Additional 5% Boost | |
| Effective Stat After Boosts: 203 | ||
| * See the Mission Boosts Player Guide for further details | ||
Avoiding PvP battles
You can deploy a Shield to be removed from the Raid list and avoid PvP battles until you're ready.
REMINDER: If you log in for 6 consecutive days, you will automatically be given a Shield on the 7th day. If you do not attack other players (PvP), you will receive a free Shield each consecutive day you log in thereafter. If you attack (PvP) other players, the Shield will be removed and your consecutive day count will be reset.
PvP strategy
Join our Discord Server to strategize with other players and delve deeper into PvP strategy. We have an entire channel dedicated to conversation about PvP.