
Endurance Stat -The Zone your Bee can reach
On Earth
Queens
- Working Queens - Genesis and Generations - Can lead missions to all zones on Earth
- Training Queens - Can lead missions to zones 1-5 based on the player’s XP level
Bees
NOTE: Landowners can send their Genesis, Gen 1, Gen 2, and Gen 3 Bees to their own Lands regardless of the Bee's Endurance stat. EXCEPTION: Training Bees' reach is limited by the player's XP level (maximum reach is Zone 5) even when doing missions on owned Land.
- Genesis, Chase Bees and Mad Honey Vial #2 Bees - Can Hunt and Harvest all Earth zones
- Gen 1, Gen 2, and Gen 3 - The zone they can reach is based on their Endurance stat (see details below)
- Training Bees - Can join missions to zones 1-5 based on the player’s XP level
Endurance Stat Required
- Zone 1: 100-129
- Zone 2: 130-139
- Zone 3: 140-154
- Zone 4: 155-174
- Zone 5: 175-199
- Zone 6: 200-229
- Zone 7: 230-269
- Zone 8: 270+
NOTE: Cocarro (Universe 2) Bees can be used on Earth (Universe 1) missions. However, Cocarro Bees (other than Cocarro Genesis Bees) will have a 50% reduction in their stats on all Earth missions.
On Cocarro
NOTE: The Endurance stat doesn't affect Explore missions
Queens
- All Genesis and Ancient Queens - Can lead any Explore or Siege mission
- Cocarro Queens - The Siege zone they can reach is based on their Endurance stat (see details below)
- Earth Queens - Cannot lead Siege missions
Bees
- All Genesis, Chase Bees and Mad Honey Vial #2 Bees - Can go on any Siege mission
- Gen 1, Gen 2, and Gen 3 - The Siege zone they can reach is based on their Endurance stat (see details below)
Endurance Stat Required
NOTE: Genesis Bees, Genesis Queens, Chase Bees, and MHV2 Bees can travel to any zone regardless of their Universe or Endurance stat
Cocarro (Universe 2) Bees and Queens - Endurance Stat Required
- Zone 1: 100-129
- Zone 2: 130-139
- Zone 3: 140-154
- Zone 4: 155-174
- Zone 5: 175-199
- Zone 6: 200+
Earth (Universe 1) Bees - Endurance Stat Required
- Zone 1:
- Gen 1: All have access
- Gen 2: 200-259
- Gen 3: 200-259
- Zone 2: 260-279
- Zone 3: 280-309
- Zone 4: 310-349
- Zone 5: 350-399
- Zone 6: 400+
Zone Indicators
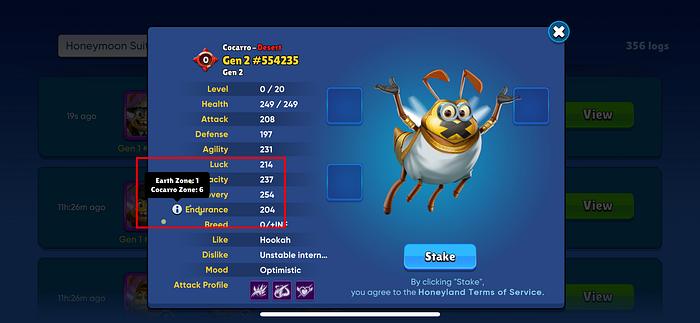
You can see the Zone a Bee can reach displayed in the upper left corner of each Bee when sending Bees on Missions.

Tap the "i" icon next to the Endurance stat to quickly see where your Bee can travel.
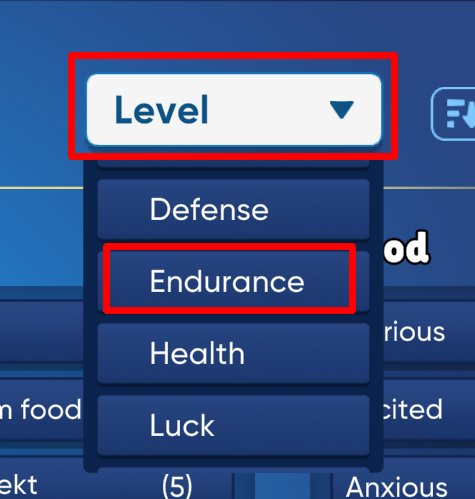
Use the Filter to sort by Endurance to group your Bees by Zone.
Zone Multiplier on Earth
The Zone of the mission impacts the effective Capacity (how much your Bee can collect) and Agility (how fast your Bee collects) stats of Harvesting Bees
Here are the zone multiplier percentages for Capacity and Agility in each Zone:
- Zone 1: 32.06%
- Zone 2: 37.71%
- Zone 3: 44.37%
- Zone 4: 52.20%
- Zone 5: 61.41%
- Zone 6: 72.25%
- Zone 7: 85%
- Zone 8: 100%
NOTE: This reduction is only in effect during the mission and does not affect the actual stats of the Bee.
For example: a Bee with Capacity and Agility of 180 will have an effective Stat of 58 (32.06%) when Harvesting in Zone 1, and an effective Stat of 180 (100%) when Harvesting in Zone 8.
Reminder:
When Hunting and Harvesting, the effectiveness of the Queen boost is impacted by the Generation of the male Bee receiving the boost.
- Genesis, Gen1 and Training male Bees receive 100% of the stat benefits
- Gen 2 male Bees receive 70%
- Gen 3 male Bees receive 40%
EXAMPLE - A Level 15 Gen 1 Queen will provide:
- 30% boost to a Gen 1 male Bee
- 21% boost to a Gen 2 male Bee
- 12% boost to a Gen 3 male Bee
See the Mission Boosts Player Guide for further details.
Capacity Stat - How much HXD you Harvest
Capacity Boosts:
- Match your Bee's Mood to the Mood of your Queen
- Match your Bee's Mood to the Mood of other Bees on the Mission
- Match your Bee's Likes to other Bee's on the Mission
Capacity Calculations:
Boosted Capacity = Base Capacity + Queen boost + any like match boost
HXD Harvested = {0.0008 * (Boosted Capacity^1.3509) * zone multiplier percentage} * 0.5
HXD Received = HXD Harvested - Land commission
These are examples of how much HXD you receive based on your Bee's Capacity stat
Higher Capacity stat = Larger amount of HXD received
| Capacity Stat - EXAMPLES ONLY HIGHER CAPACITY STAT = LARGER AMOUNT OF HXD RECEIVED | HXD Harvested (No Boosts Applied) |
| 100 | 0.2015 |
| 130 | 0.287 |
| 140 | 0.317 |
| 155 | 0.364 |
| 175 | 0.4285 |
| 200 | 0.5135 |
| 230 | 0.62 |
| 270 | 0.77 |
Agility Stat - How fast you Harvest HXD
Agility Boosts:
- Match your Bee's Mood to the Mood of your Queen
- Match your Bee's Landform Specialty to the Land you are Harvesting
- Harvest on Lands that have an active Paradise Maker
Effective Agility = ((base + <queen boost>) * <landform boost> ) * zone multiplier
Honey (HXD) a Bee can collect per min = {0.000012 * (Effective Agility stat^1.3)} * 0.5
These are examples of different Agility stats and the corresponding Harvest speed
Higher Agility stat = Faster Harvest
| Agility Stat - EXAMPLES ONLY, HIGHER AGILITY = FASTER HARVEST | Harvest Speed Honey per Minute | Honey in 60 Minutes | Honey in 90 Minutes | Honey in 120 Minutes |
| 100 | 0.0025 | 0.15 | 0.225 | 0.3 |
| 130 | 0.0035 | 0.21 | 0.315 | 0.42 |
| 140 | 0.0035 | 0.21 | 0.315 | 0.42 |
| 155 | 0.004 | 0.24 | 0.36 | 0.48 |
| 175 | 0.005 | 0.3 | 0.45 | 0.6 |
| 200 | 0.006 | 0.36 | 0.54 | 0.72 |
| 230 | 0.007 | 0.42 | 0.63 | 0.84 |
| 270 | 0.0085 | 0.51 | 0.765 | 1.02 |
Recovery - How long your Bees are on Cooldown after Hunting and Harvesting Missions
Your Active Queen provides a Cooldown Reduction for Bees after Hunting and Harvesting missions
- Genesis Queen - 25%
- Gen 1 - 15%
- Gen 2 - 8%
- Gen 3 and Training Queens don't affect cooldown
THESE ARE JUST EXAMPLES
Higher Recovery stat = Shorter cooldown
| Recovery Stat EXAMPLES - THE EXACT COOLDOWN WILL BE BASED ON THE RECOVERY STAT AND THE GENERATION OF YOUR ACTIVE QUEEN | Cooldown Time in Minutes |
| 65 | 241 |
| 100 | 183 |
| 130 | 154 |
| 140 | 147 |
| 155 | 138 |
| 175 | 127 |
| 200 | 117 |
| 230 | 107 |